Hosting my blog on GCP
In the spirit of this whole blog, my goal is to learn about and gain experience with GCP. Therefore, it was a no brainer that I should host and run it using GCP. This post outlines my initial steps to get this blog up and running quickly and accessible on the web.
Blog Platform
I am very aware of how I can be susceptible to analysis paralysis, easily getting lost down a rabbit whole of options. This was front of mind when I tackled my first task, selecting a platform for this blog.
While free blogging platforms like WordPress are incredibly user-friendly and offer features like user accounts and comment sections, they might be overkill for a personal journaling blog such as this.
Static site generators, on the other hand, excel in simplicity and speed. Since this blog focuses on journaling and doesn't require dynamic features, a static site generator allows control over the design and content, while keeping things lightweight and lightning fast.
It's like the difference between a feature-rich social media app and a handwritten journal - both serve a purpose, but for a personal record, the simplicity and customisation of a static site generator is a perfect fit for me at this stage.
Static site generator options
My initial search of the web lead me to narrow in on Hugo and 11ty. Both Hugo and 11ty are popular choices for static site generation, with some key differences to consider:
Learning Curve:
- Hugo: Uses Go templates, which require some familiarity with Go syntax. This might have a steeper learning curve for those new to programming.
- 11ty: Employs JavaScript and relies on templating languages like Nunjucks. If you're already comfortable with JavaScript, 11ty might be easier to pick up.
Performance
- Hugo: Generally considered to be faster for both build times and rendering due to its use of Go, a compiled language.
- 11ty: While still performant, might have slightly slower build times compared to Hugo. However, the difference is often negligible for smaller websites.
Community and Resources:
- Hugo: Has a larger and more established community, with a wider range of themes and plugins readily available.
- 11ty: Has a growing community, but the selection of themes and plugins might be smaller compared to Hugo. However, 11ty's flexibility potentially allows for easier integration with third-party libraries.
Conclusion
Given I don't anticipate my blog will become a performance-critical site, and the fact I have more familiarity with JavaScript vs Go. 11ty seemed like a good fit. Additionally the fact it should allow for further customisations, it will hopefully allow me to expand on it relatively easily in the future if needed.
Getting my blog running locally
Having selected 11ty as my platform of choice, I quickly found the blog starter 11ty-blog-start courtesy of Rong Ying.
The ReadMe was clear and provided an easy way to get it up and running locally on my machine within seconds.
I opted to use GitLab as my Git repository over the more industry standard of GitHub. This was purely as a spur of the moment decision as a further opportunity to learn about alternatives that I don't often get exposure to in my day job.
This did involve a slightly convoluted process (I'm sure there is probably a better way) of using the 11ty-blog-start as a template in my GitHub account, resulting in me having my own copy.
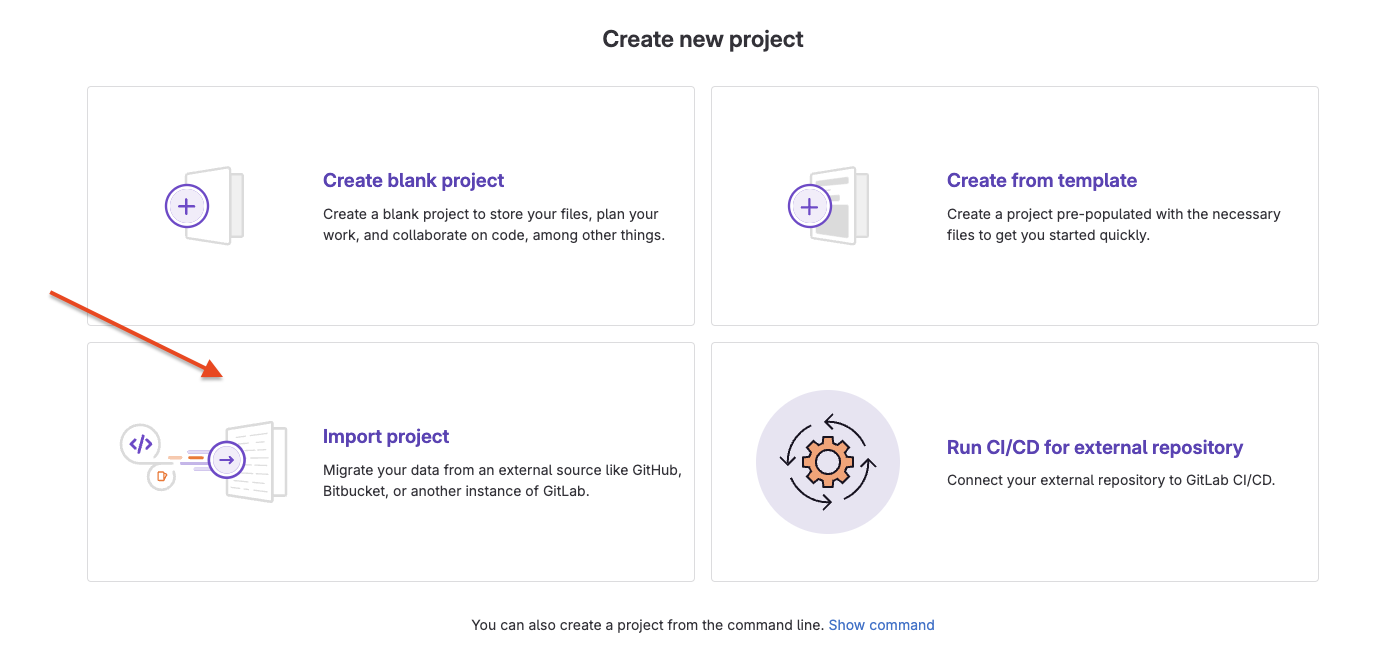
I then logged into my newly made GitLab account and created a new repository via the import project option.
I was then able to quickly get my site up and running via a simple npm start command.
I made some minor style changes, but on the whole kept the format of the blog very similar to the original template to prevent procrastiating from my real goal, getting it hosted on GCP and on the web!
Hosting on GCP
Given my 11ty blog is purely staic content, it doesn't require a Compute Engine instance or database.
Here's why a static website can be efficiently hosted in a GCP Cloud Storage bucket and accessed via a Load Balancer, compared to using a Cloud Compute instance with application code and a database:
Advantages of Cloud Storage and Load Balancer:
- Simplicity: Cloud Storage is designed for static content like HTML, CSS, and JavaScript files. Uploading your pre-built website files to Cloud Storage is straightforward, requiring minimal configuration.
- Scalability: Cloud Storage automatically scales to handle increased traffic without any need for manual intervention.
- Cost-Effectiveness: You only pay for the storage space used and the amount of data transferred for your website. For static websites with minimal traffic, this can be very cost-effective compared to running a whole Compute instance.
- Security: Cloud Storage offers built-in security features to protect your website files from unauthorized access.
- High Availability: Cloud Storage replicates your data across multiple zones, ensuring high availability and redundancy in case of outages.
Disadvantages of a Cloud Compute Instance:
- Complexity: Setting up a Cloud Compute instance requires configuring the operating system, installing application code, managing a database if needed, and ensuring ongoing maintenance.
- Scalability: Scaling a Compute instance manually to handle traffic spikes can be complex and time-consuming.
- Cost: You pay for the instance running time regardless of traffic, which can be expensive for static websites with low traffic.
- Security: Managing the security of the operating system, application code, and database adds complexity and requires ongoing attention.
Load Balancer Integration:
- A Load Balancer in front of Cloud Storage distributes traffic across multiple Cloud Storage instances if necessary, ensuring high performance for your website.
- This further enhances the scalability and fault tolerance of your static website deployment.
I will automate my build process using GCP Cloud Build and document this in another post. But today it's all about getting it visible on the web.
Thankfully GCP have already written a very comprehensive and easy to follow guide on how to Host a static website in their Cloud Storage documentation.
I followed this guide and it worked perfectly well.
A few side notes:
- I created a new project in GCP for my blog.
- At time of writing, GCP don't offer a domain purchasing service like Route53 in AWS. This was a bit of a surprise to me at first. Google used to offer domain registrations through Google Domains as a seperate service to GCP but as of September 7, 2023 they sold the service to Squarespace.
- I purchased my domain gcpjourney.com through 123Reg a UK based accredidted domain registrar (it cost £21.59 for 1 year)
- When waiting for my SSL certificate to be provisioned it took over 25 hours for it to do so (https://cloud.google.com/storage/docs/hosting-static-website#recommended_monitor_the_ssl_certificate_status)
Creating an A record using 123Reg was very easy and you should be able to do so using whomever you purchased your domain from using their documentation.
Uploading my blog to Cloud Storage
Using 11ty to produce a build of my blog is as simple as running the command npm run build which produces the output directory _site on my local machine.
I simply uploaded all of the files and directories from the _site directory into my GCP Cloud Storage bucket via the Google Cloud Console using the 'UPLOAD FILES' and 'UPLOAD FOLDER' buttons (like I mentioned earlier, I will automate this at a later date).
Note: don't place the _site directory in your bucket, just it's contents. Your index.html file should be available at the root of your bucket for 11ty to work.
Conclusion
My site is up and running, evidenced by the fact you are reading it now!
The GCP documentation was great, very clear and easy to follow. I personally found it far more comprehensible that other cloud providers docs.
I have omitted some of the details as to how 11ty works, but that's not the real focus of this article and you could easily substitute this with an alternative static site generator.
Software professional. Dad. Edinburgh.